Jonna’s iPod Touch
Reply

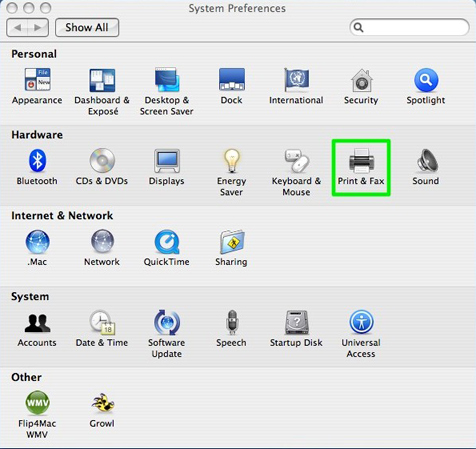
I found one annoyance about Mac OSX. I could not figure out how to set my Mac up to print to our shared printer that is connected to a Windows XP machine.
Well, thats not necessarily true. I figured it out once, but for some reason it just stopped working using the standard printer setup. Since then, I’ve been printing to PDF, emailing the document to myself, and grabbing it on the machine with the printer and printing the PDF. Since we were setting up Jonna’s new Vista machine anyway and working through those connectivity issues, I decided to work on getting printing to work for real.
After culling through a bajillion posts today, I finally figured out how to do it. I figured this ‘pictorial’ could give you all of the steps you need to do without having to go through the effort that I did to get the information.
As an aside, all images were grabbed and marked up using Skitch.

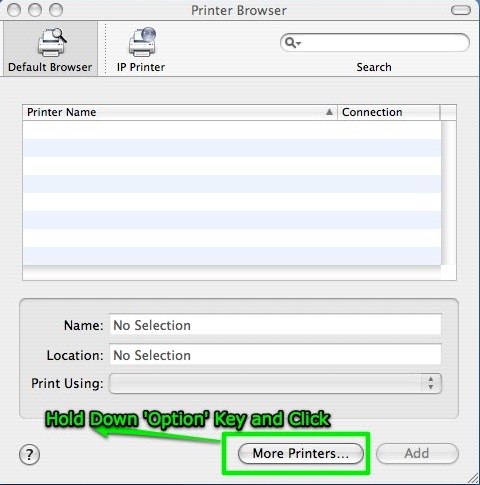
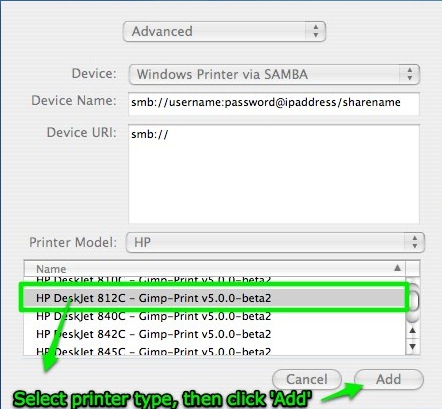
Apple made it very non-intuitive to get to the advanced options. You have to hold down the Option key, then click “More Printers” in order to get to it. This annoyed me. The advanced option should be there no matter what. I shouldn’t have to do anything special to add the smb: address of the printer.

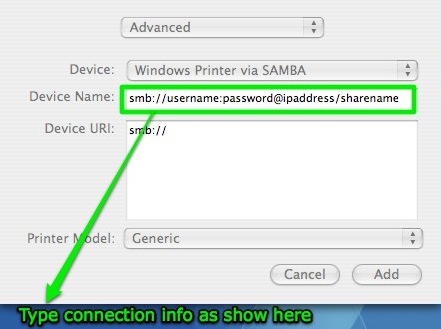
‘username:password’ is the username and password to log into the Windows machine with. IP Address is the IP of the Windows machine with the printer, and finally share name is the name you gave to the printer when you shared it.
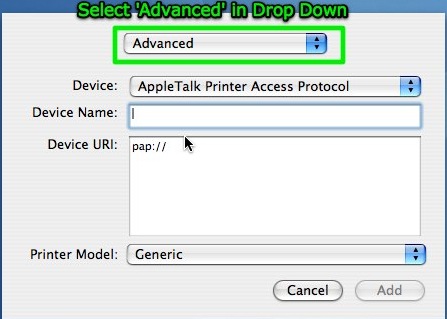
I hope this “graphical representation” of the process helps you get your shared printers up and running. This is what I needed. Rather, I had to read through many false starts and theories before getting to the meat of the issue, which was essentially getting to the ‘Advanced’ options in the print manager. Now you know the secret. Happy printing!

Photo by rbieber
Kudos to Apple for getting an even larger share of my wallet. When you buy an 80G iPod, the only way you can charge it is through your PC. In order to charge via AC power (say when your getting ready to travel and will not be taking your home machine with you), you have to spend another $40 on a USB Power adapter. These use to come WITH the unit.
“…the only way to be truly satisfied is to do what you believe is great work. And the only way to do great work is to love what you do. If you haven’t found it yet, keep looking.” – Steve Jobs (quote from Quotiki)
Since buying my Macbook in June, I’ve become extremely addicted. I’ve made an investment in repurchasing software where necessary and buying software that I’ve talked about on the blog and have converted over to it being my primary machine. I’ve been extremely impressed with the machine thus far and actually, at this point, find it torture to move back to Windows for any period of time.
I’ve had really no problems until recently. All of a sudden over the past four weeks or so, I’ve had issues with the magnetic AC adapter plug actually seating properly. At first, I would go into the living room unplugged, come back to plug in and would notice that the light on the AC adapter plug didn’t go on. A quick jiggle and the machine was charging again.
More recently, the light would just turn off randomly and the ‘jiggling’ became a more concerted effort to get the plug seated. So I decided on Saturday that it would be a good time to make my first trip to the Genius Bar over at the Apple store in Woodfield to see what they could do for me.
Once again, I have to hand it to Apple. I walked into the store and explained my problem and the person at the register kindly explained to me that I could walk to any machine in the store, hit the ‘Concierge’ button on any of them, and schedule time with a ‘Genius’. As soon as we registered, my name appeared on a screen above the bar, along with a ton of iPod and OS X tips that circulated on the screen so I knew exactly where I was in line and had something to do while I waited.
When my turn came, I went up to the bar, pulled the machine out of its original box and explained the problem. A quick test of another plug found the AC plug to be bad. A few minutes later I had a brand new AC adapter and was walking out of the store to have lunch with Jonna.
I like the environment that Apple has created in its stores. Its a marked difference from going to the ‘Geek Squad’ at Best Buy. Going with the same problem there would have been standing in line getting irritated because nothing was there to keep my head busy except watching the 4 people in front of me, only to get up to the counter to watch some kid fumble around with the machine (not the plug) until I had to direct him to what the actual problem was (I’ve had this happen, its rather irritating). Apple obviously realizes the problems with standing in line with a problem and has gone to the lengths to keep people occupied and interested in something as they wait.
I also found the staff to be extremely knowledgeable and polite as I watched the people in front of me get their problems solved with their iPods, which usually came down to a reboot, which while is documented in the manual, even I had issues with (I tend not to read manuals). The staff dealt with even these common sense (once you know them) questions politely and like it was the first time they had answered them.
I have to give major kudos to Apple for the concept of the Genius Bar. It made for yet another positive Apple experience for me.

Photo by rbieber
My recent upgrade to an 80G iPod gives me way more breathing room than I had with the 20G, and I can finally carry family photos around to boot!
I found this really cool regular expression widget for the Mac Dashboard. It allows you to test regular expressions against text – and puts it right at your fingertips. Nice!
Found these Apple UK commercials via Slashdot. I found them quite amusing, especially the vacation one.
I thought I’d take some time to sit down and document the tools I’ve been using lately as I continue my acclamation into the MacIntosh world. These are tools that I’ve found really useful over the last six months or so.
Some additional software I’m looking at that looks useful, but I don’t have need for it yet:
I’m still looking for good image editing software that doesn’t cost a bajillion dollars (like Photoshop) and doesn’t require X-Windows to be installed. If anyone has any suggestions, I’d be happy to hear them.


