I’ve been running the same Linux server for about 10 years. Consequently, its pretty slow and outdated, and when I finally had time to upgrade it to Ubuntu from SuSE 9 while I was on vacation, found that I couldn’t really get anything but Ubuntu 8.04 installed on it. So it was time for an upgrade.
I opted to go with a Mac Mini server – for a few reasons. The price was basically comparable to an Intel server with the same technical specifications (minus any kind of CDROM drive, which I found out later) – but the big selling point for me was the amount of space I could save in the office with the Mini. A side benefit was, of course, being able to play with Snow Leopard Server.
After the initial set server setup – which was painless – my first task was to create a caching DNS server so that all of the machines in the house could point to the same place they were when the Linux server is shut down. One of the primary purposes of the Linux server over the years, aside from being a file server, has been to cache and manage local DNS for the machines in the house. I already had plans to run an Ubuntu Server in a VM on this box to replace my aging Linux box (I still need Linux around), but didn’t think it was acceptable to have to boot the machine, THEN a VM in order to have DNS working. I also did not want to do a DNS setup on a box by box basis on every machine in the house.
I was a little confused at first. I’m used to configuring bind directly. After some googling around and not finding much of anything around doing this on OSX Server, I posted a tweet asking if any of my followers knew of a HOWTO that would explain what I needed to do.
I actually tweeted a little too soon. I think I found the settings about 2 minutes after the tweet went out. It was way easier than I thought it would be and I thought I’d throw up a quick step-by-step tutorial so that folks wanting to do the same thing could save themselves a couple of seconds.
So here we go.
In the dock, find the “Server Admin” icon and click it. It looks like this:
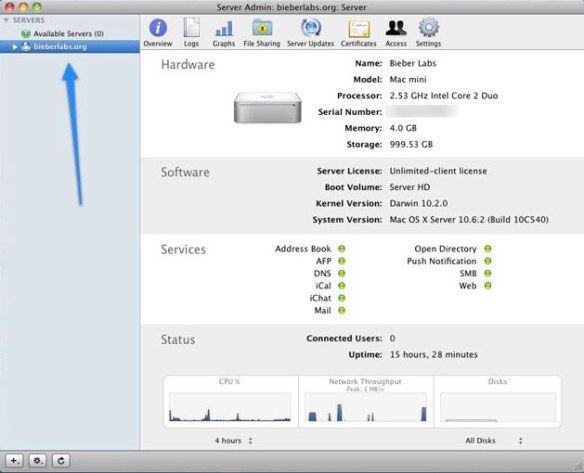
When the “Server Admin” Tool opens, you will see the main screen like the following. The blue arrow is pointing to the domain you specified while setting up the server.
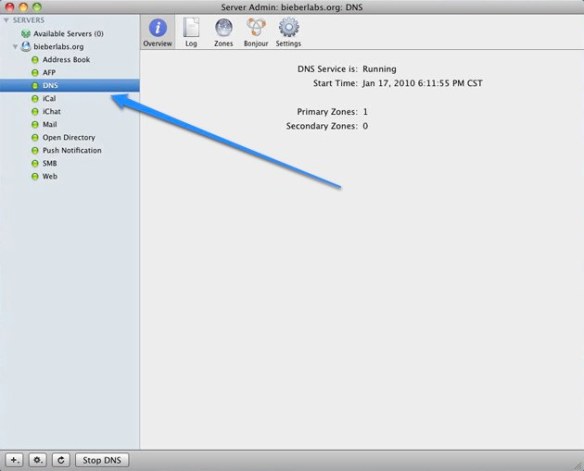
Open up the domain for your network, and you will see a bunch of services to configure. Select DNS as shown in the following screen shot:
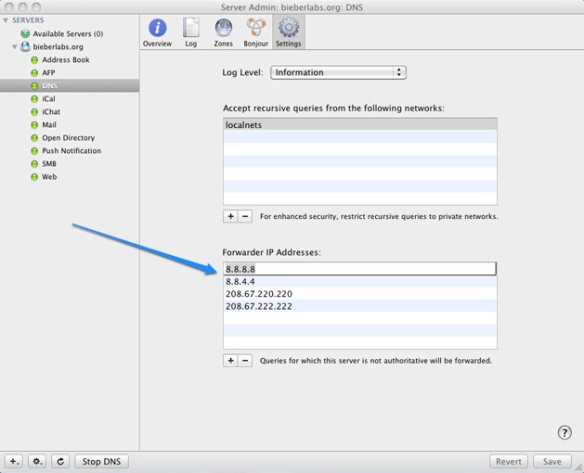
Once you select DNS in the side navigation, select “Settings” at the top. This will show you the following screen:
You’ll see a box conveniently titled “Forwarders”. Add the IP addresses of the DNS servers you would like to forward requests to in this box by clicking the ‘+’ key and adding each independent IP. As you can see here, I am primarily using Open DNS with Google DNS as a backup. Trust me, contrary to the picture, OpenDNS is first.
Once you have entered your DNS IP addresses, click “Save”. Point your boxes to the IP for your Mac Mini server and voila! You have a caching DNS server.
I hope this was helpful. For those of us who are used to configuring bind with vi, it may be a little confusing or intimidating to try to mimic this functionality on OSX Server. As you can see, its really a no-brainer – and no text editors need be opened.


